|
MySQL is compatible with the ODBC (Open DataBase
Connectivity) standard, and even offers its own ODBC drivers (known as
MyODBC) free for download from the MySQL site (http://www.mysql.com/). MyODBC makes it possible to incorporate MySQL into
quite a few interesting applications, including Microsoft Access. In this
article, We’ll demonstrate just how easy it is to install and configure
MyODBC and subsequently use Microsoft Access to manage MySQL data.
MyODBC Installation
The first step in the MyODBC installation process is to go to the MySQL
Website and download the latest version of the MyODBC drivers. They are
located at: http://www.mysql.com/downloads/api-myodbc.html.
Incidentally, the drivers are available for all Windows, UNIX, and Solaris
platforms. However, since the demonstration will be devoted specifically
to integration with MS Access, it is assumed that either the correct
Windows version of the drivers will be downloaded. To summarize the
installation process:
- Download the drivers from the URL given above.
- Unzip it using your favorite ZIP package. WinZip (http://www.winzip.com)
is particularly popular solution.
- Click on Setup.exe. This will begin the installation process.
- A Welcome prompt will appear. Click Continue.
- A Install Drivers prompt will appear. Highlight the MySQL
driver in the Available ODBC Drivers box and press OK.
- Installation of the various files will begin. If you get an error
referring to the MFC30.dll file, please read the Note found below.
Otherwise, proceed to next step.
- A ‘Data Sources’ prompt will appear. Just press Close for now.
- A Setup Succeeded! prompt appears. Congratulations, MyODBC is
now installed.
Note: Installation problems relating to the MFC30.dll file
are often encountered when installing MyODBC. If error messages appear
while installing MyODBC, there are two options:
1. Restart Windows in Safe Mode (Press F8 during reboot). Once
rebooted, perform the installation process as outlined above. Then
reboot once more, this time normally.
2. Edit the odbc.inf file, deleting the line (only do this if using
Windows 98/NT): "MFC" = 1, mfc30.dll,,,, 1995-07-11, ,,,
,,,,,, 322832,,,, 3.2.0.0,.
Now The installation part is complete.
Updating the ODBC Data
Sources
The client machine must be able to communicate with the MySQL database
before it can be incorporated into an Access project. This is accomplished
by adding it to the ODBC Data Source Administrator (ODBC DSA). The ODBC
DSA can be accessed by clicking on the ODBC Data Sources (32bit)
icon located in the "Control Panel" folder or by clicking on
"Administrative Tools" in the control panel then Data Sources
(ODBC).
Clicking on the icon will result in the appearance of a window very
similar to the one shown in Figure (1). Click on the System DSN tab
found at the top of the window, and then click on the Add... button to add
a new data source.
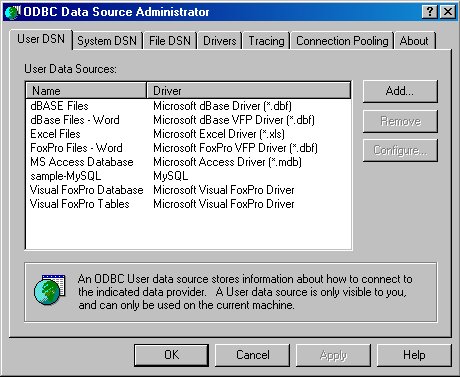
Figure (1) The ODBC Data Sources window.
Clicking on the Add button will produce a Create New Data Source
prompt. The user is requested to select a driver for which a new data
source should be set up. Scroll down and highlight the one that says MySQL.
Click Finish. This in turn will produce a new window, which
contains a series of text fields relevant to this new data source.
Although all text fields are in some way relevant to the data source,
there are a few which are particularly important:
Windows DSN Name
The Data Source Name (DSN) is the name used to represent the data source
that is to be made available. Typically we assign this the same name as
the database, or choose a name that unmistakably refers to that database.
MySQL Host (name or IP)
This is the hostname assigned to connect to the MySQL database specified
in the field "MySQL database name" (see below). Of course, this
hostname should be the same as the host from which this client will
connect, or the connection will fail.
MySQL database name
This is the name of the database made available
via ODBC.
User
This is the user name assigned to connect to the MySQL database specified
in the field "MySQL database name".
Password
This is the password assigned to connect to the MySQL database specified
in the field MySQL database name.
Fill each of these in which the correct information as it applies to the
parameters you specified when setting up the database. Click the OK
button, and you will see that the database data source has been added to
the data source list. It is now ready to be used by Access, or any other
MyODBC-capable application.
Interface between MySQL and Microsoft Access
Example Now we
will explain how to import the newly
ODBC-accessible MySQL database into Access. Also, preliminary information
regarding making concurrent updates to the MySQL database through an
Access GUI is provided.
The Microsoft Access GUI
Synchronizing the MySQL database to an Access GUI is actually a fairly
simple procedure. The first steps is simply to fire up MS Access. Upon
doing so, the user will be greeted with a screen very similar to the one
shown in Figure (2).
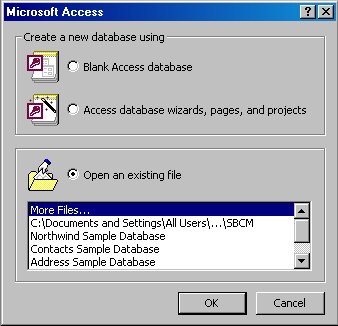
Figure (2) Microsoft Access Welcome Window.
Choose the radio button labeled Blank Access Database, and press OK. A new
window will appear, prompting for a location in which to save the new
database. Name the new database as the database name with the extension
".mdb", for example "mewsoft.mdb" where "mewsoft"
is the name of the database used in this article, and navigate
to the location where the database should be saved. Press
"Create" to save the database.
The database will be saved, and a new window will subsequently appear.
This window will be very similar to the one shown in Figure (3).
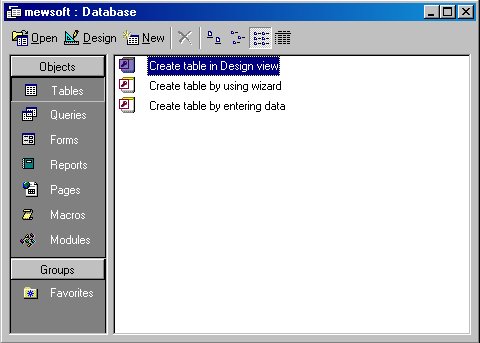
Figure (3) New database window
At this point, the MySQL database can be connected to via
ODBC, and its structure and contents updated to the "mewsoft.mdb"
Access database.
Importing and Linking the
Data Source
There are essentially two functions provided by MS Access which are used
to associate the MS Access database with the data source, each accessible
via the File-->Get External Data submenu:
Import
The Import option should be used if any data found in the data source will
be subsequently used exclusively in MS Access. That is to say that no
other applications will have the data source data available to them.
Link Tables
The Link Tables option should be used if the data found in the data source
will be updated using applications other than the MS Access. This is
likely the choice that the user will want to employ, since it is the
intention that MS Access will update the data stored within the MySQL
database server in addition to its own internal tables.
Therefore, choose Link Tables from the Get External Data submenu. Doing so
will create a "link" between the data source tables and MS
Access. Any information updated using the Access Interface, will
automatically update the MySQL database, making the information
immediately available from any application using that data. Choosing Link
Tables will result in the familiar looking navigation window to appear.
However, nothing will actually be selected in the window. Instead, go to
the Files of type drop-down menu located at the bottom of the window, and
choose ODBC Databases(). This is illustrated in Figure (4).
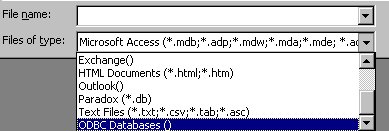
Figure (4) Choosing ODBC Databases()
Doing so will cause yet another window to appear. Choosing the tab
entitled Machine Data Source will produce a window very similar to that
shown in Figure (5). Notice that the database DSN is included in the data
source name listing. Click on the database DSN and press OK. This will
produce one final window, which lists all of the tables found in the
database. Click on any table to select or click on Select All to select
all tables and press OK. The window will close and the original database window
Shown in Figure (3) will reappear, this time including the names of
those tables chosen in the window. Next to each table name will be a globe
with an arrow pointing to it. This signifies that these tables have been
linked to those found in the data source.
Note: The client machine must be connected to the Internet, otherwise it
will be impossible for MS Access to update the new database with the
information found in the data source tables.
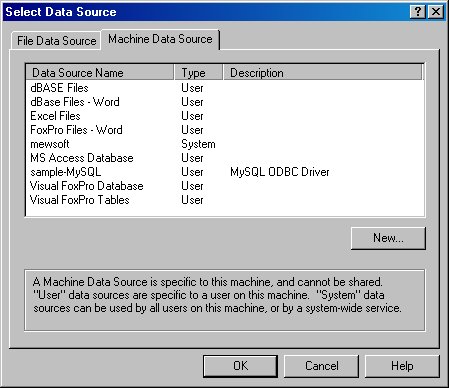
Figure (5) Machine Data Source window
Double-click the clients table name, and window will appear displaying the
table structure. Notice that the columns are the same as those found
within the MySQL table.
Congratulations. An ODBC connection to a MySQL database has been
successfully carried out. Next
we will show how
inserting information into the linked tables via the Access database will
cause the MySQL database to be simultaneously updated.
Updating The
Database
Figure (6) shows a GUI created using the MS Access New Object->Auto
Form. You also can create any GUI using MS Access Form Wizard. After
creating this GUI, you can use it to insert or edit records. 
Figure
(6) MS Access Users Table GUI.
Create a GUI similar to the one shown above for each table, and experiment
with inserting information into it. Immediately upon doing so, connect to
the MySQL database. The tables will be updated with the information
entered using the MS Access GUI immediately. Figure (7) shows the Users
table as seen from MS Access after entering with some records.
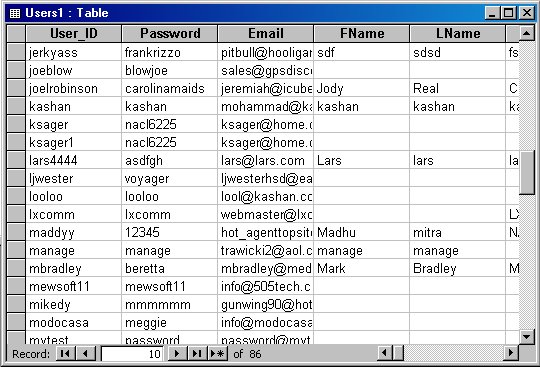
Figure
(7) View of the Users table from MS Access. Please
take your time to experiment with MS Access. Please note we do not support
any third party products like MySQL, MyODBC, MS Access, etc.
|